 |
||||||||||||||
Musings from Bridgnorth pattern-shopOccasional notes from Brian Oldford beavering away at Bridgnorth's volunteer Pattern-Shop. More recent activity can be found here: Bridgnorth Pattern Shop 2007.
|
||
| December 2006 | ||
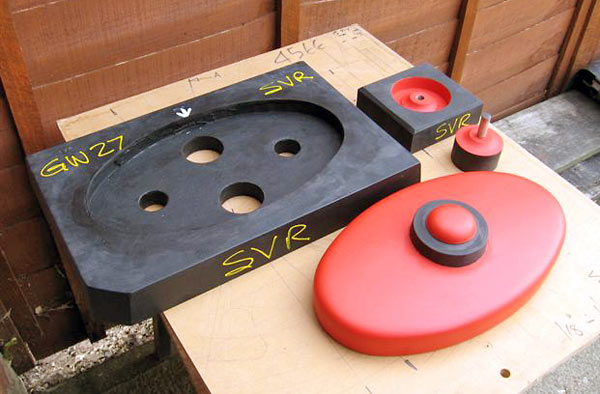
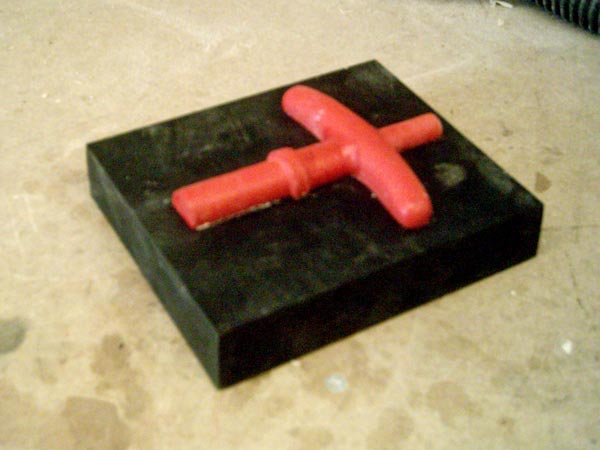
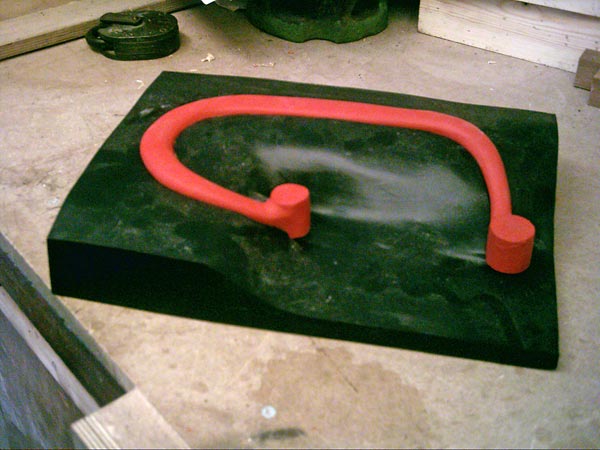
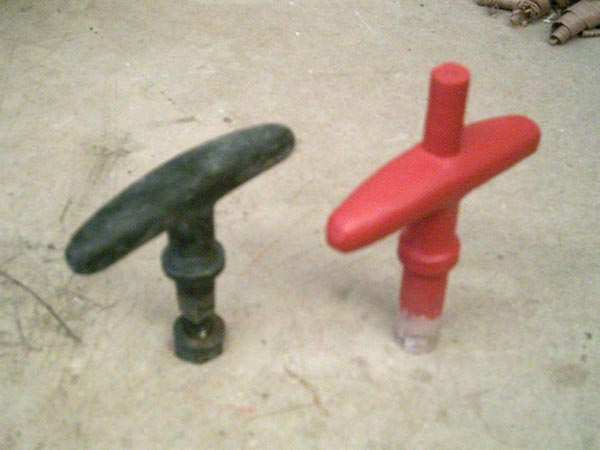
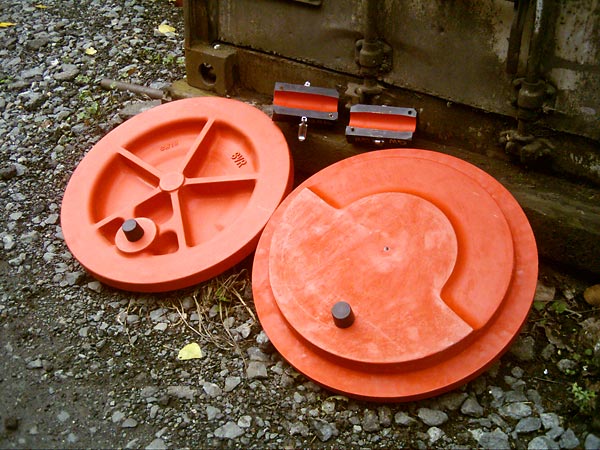
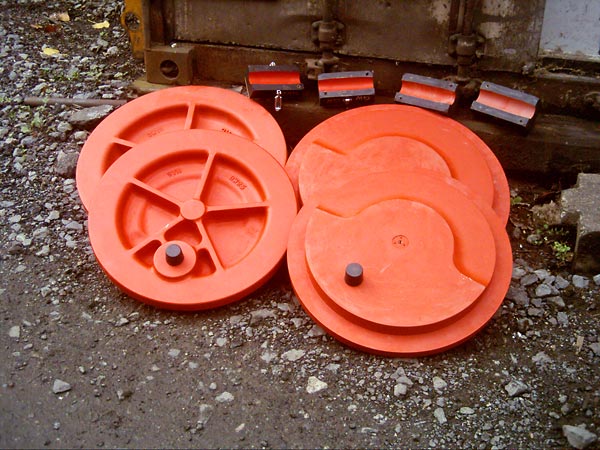
A view of the GW sandbox lid pattern recently completed by Gordon Woodruff. As readers can see this the lower lip of this quite thin (and hence possibly fragile) pattern is generated using an oddside. The handle required a toroidal (doughnut) core to produce the undercut. It is thought quite a few ex-GWR locomotives left Barry devoid of these parts since they were very accessible, and hence removable, as trophies. |
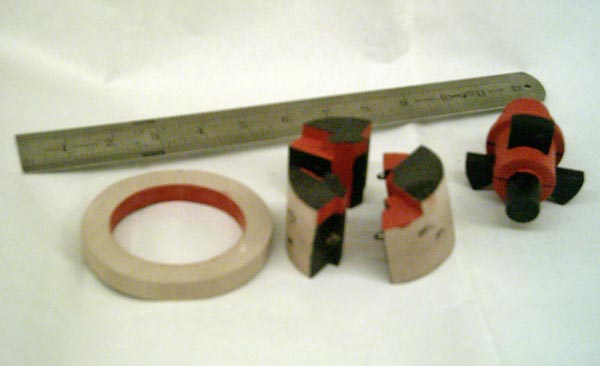
This is the water outlet spout pattern, corebox and nickel/chrome plated original also recently completed by Gordon. This is a combined H&C outlet to the handbasins for RFO 7511. Photos: Gordon Woodruff |
|
| November 2006 | ||
|
Above is one half of the recently completed opposite-hand Great Western WC flush valve with the corresponding half of the original made by Gordon Woodruff. Fortunately the major core is interchangeable - the core box is resting on top. These patterns are fitted into double-sided boxes so the split-line is formed by the ply-wood base of the box - the other half is out of sight at the back of the two boxes.
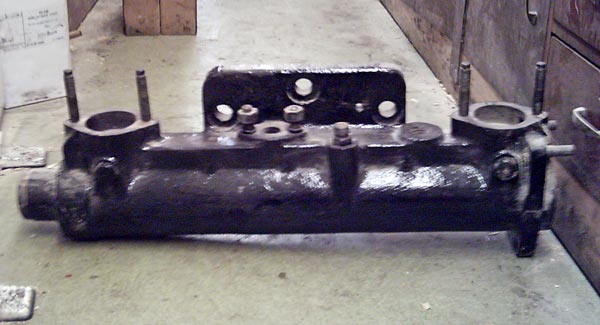
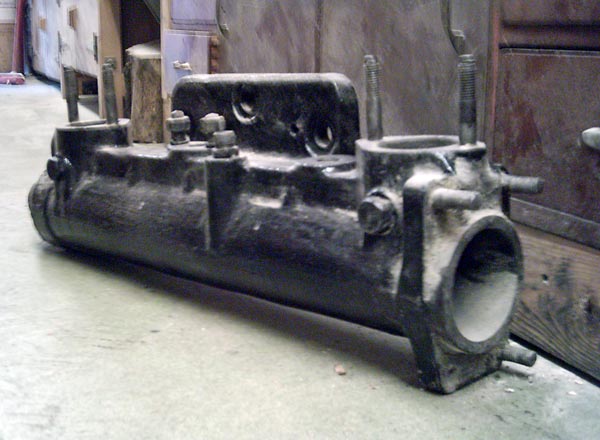
The GW cylinder covers that Gordon Woodruff made the pattern for (below) have now been cast. Approx 100Kg of grey iron before machining. These two views show the inside and outside. |
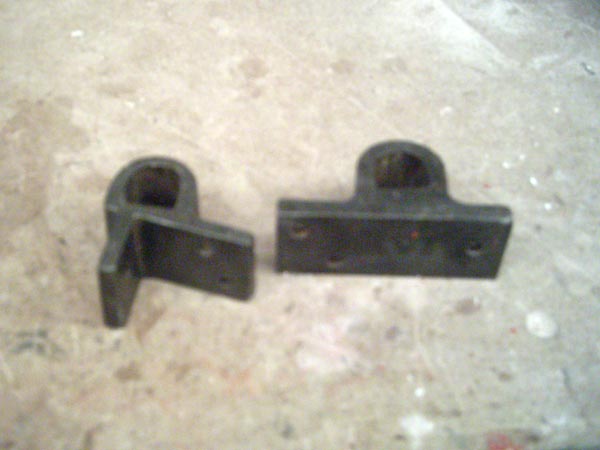
Here are two original parts of the Siphon G door securing mechanism... I recently had some discussion over the potential dimensional error the Siphon door securing mechanism part (below) may have if cast in iron where the pattern has been made with the appropriate contraction ratio for steel, or vice-versa. The nominal contraction we use for iron is 1/8"/ft (approx 1%). The nominal contraction we use for steel is 1/4"/ft (approx 2%). The square flange of the fitting is approximately 3" square. This means we could get an error as large as 1/32". I think we can live with that! Coming soon...
|
|
| October - 3 2006 | ||
Colin Jenkins came to Bridgnorth at the weekend to collect some of the work he'd left with me to fill my idle moments...
Although not new work, here is a GW toilet flush valve made by Gordon Woodruff some time back (the machined and completed valve is shown April 2005) We have now learnt the GW had left and right handed versions. Guess what? Our friends at Bewdley now need some valves and, surprise surprise, not of the hand Gordon made. The gods have smiled upon us this once since the corebox can be used for both versions. The picture also showed some of the internal pieces of the valve including the valve cage and the poppet valve proper.
Here's another simple pattern Colin asked me to make for the Siphon's door securing mechanism. This will be cast in steel or iron. If iron, the stud will be removed and a threaded steel insert will be fitted. If steel, the threaded stud can be integral.
This image shows the left and right handed GW door jamb striker plates located in their embryo oddsides. These will also require a small core to get all the detail needed to function correctly.
This image is of a pattern made by a lapsed volunteer patternmaker (Neil Butler) and the GW toilet flush valve cam follower it produces. This pattern was thought to have been lost but was recently discovered in the loco pattern store. It is now in the safe hands of the C&W restoration team. |
The two photos above show parts of GW door locks. On this rare occasion I discovered both left and right handed versions were needed before I started work. Many coaches currently in service are running around with fittings that have been "robbed" off vehicles in the queue. The result is that many of these "late choice" vehicles are entering works almost stripped of fittings. We obviously also have a legal obligation to ensure vehicles in service have locks that are replaced when worn.
Here is the completed GW door handle and oddside ready for delivery. At present I'm trying to find the pattern set made some years back (by others) to produce the fluted iron base below GW WCs. This pattern set demonstrates yet another 'trick' to mould awkward shapes in that it uses a three piece moulding flask. Two for 9103 were photograph in December 2005. |
|
| October - 2 2006 | ||
Oh! the deep joy of running a railway with obsolete kit.
Here is the pattern for a GWR coach commode handle (no I don't know why its called a commode handle). As you can see it would have a wiggly split line were it a split pattern and being quite thin would be rather fragile and have greater likelihood of distortion.
Non-patternmakers might like to know there is another trick for solving this problem. The photo above shows the commode handle placed into what is known as an "odd-side". To mould the handle the following procedure is used. The pattern mounted in the odd-side is placed on a board and surrounded
with what will form the lower portion of the flask as in Fig 2. This then inverted |
Above is an embryo GW door handle pattern and the original it is
being produced from. Observers will notice I've included a mounting stub
on the pattern to assist the machinist when he comes to mount the
casting to machine the square and threaded portion that end up concealed
within the door. Although this pattern could have been made as a simple
split pattern with a straight join line I have again opted to make an The NE dimension plates for 2701 have been completed and passed on to the guys at BY. Colin Jenkins has informed me the non-ferrous foundry the C&W use over Dudley way had a spot of bother figuring out how the mixer valve pattern worked. Don't blame me. I didn't design the original!
|
|
| More on the 'odd-side' | ||
Here's a few further notes on how I made the odd-side and how it would be used.
|
The final operation was to drill a few holes right through the odd-side from the pattern cavity, so the pattern can be held down in the sand in the drag to prevent it lifting when the odd-side is removed before the cope is made. Not overly technical. It just requires a fairly keen eye and a bit of patience building the filler up, knocking it back with 80 grit abrasive paper and then building it up smoother several times. When the finish starts to look someway half decent I work through finer papers 160 and/or 220 grit before a couple of coats of Pattern paint. (This a high build cellulose paint formulated for and labeled by John Burn & Co). |
|
| October - 1 2006 | ||
Hugh McQuade (with my assistance on the manufacturing side) is hoping to fit a further batch of table lamps to LMS Buffet 149 recently outshopped. As usual there is a dependency on funding, but again the bigger the batch of castings in one go the cheaper per item. The BR & LMS coach fund has been fortunate in getting sponsorship for some of 7511's table lamps within the BN volunteers. If we do any more lamps in one batch the machining may become as repetitive as the radiator fins. Grrrrrrr! The plan for the 1/2 bay at the end of the vehicle is to fit the LMS style wall lamp since a lamp mounted mid-window would strike the window seat occupants shoulder. The bow ended dimension plates for 2701 is progressing now I've been to Burn & Co at Stetchford to collect the 1" high letters and numbers. I have completed the GWR commode handle pattern. This would require a very "wiggly" split line were it to be a regular split pattern. As a result I will be making an "odd-side" to make the moulder's job a little easier. |
GWR door handle (to suit 2426 and other GWR vehicles no doubt) progresses i.e. part turned. I have yet to decide whether this will be let into an odd-side or be split. The modified nut for the lead pipe that goes between the toilet cistern and bowl is complete bar a final lick of paint to the core-box. I happened to briefly stop off at BH to pick some paperwork up. Richard Barr (of Barr & Grosvenor fame) happened to be delivering some fire bars (including some cast from the recently modified pattern). He mentioned that Colin Jenkins has had a further batch of GW radiators cast. I've no idea for which vehicle; but hey ho! the pattern has already been proved. |
|
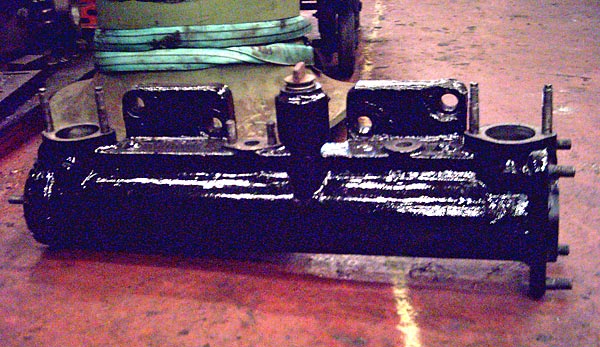
These are some of the cylinder covers Gordon Woodruff has been busy making. Looking at either side of the two shown they appear identical. But careful inspection will show the cut-out to clear the steam port on the inside is not symmetrical to the cored hole and webs. As a result left and right are dissimilar. Note Gordon minimises effort but using the same corebox for the pair. |
And here is yet another pair (left & right) of a different diameter. |
|
| September-2 2006 | ||
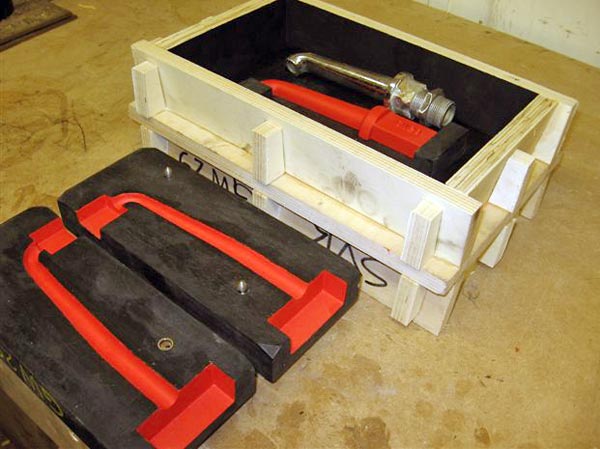
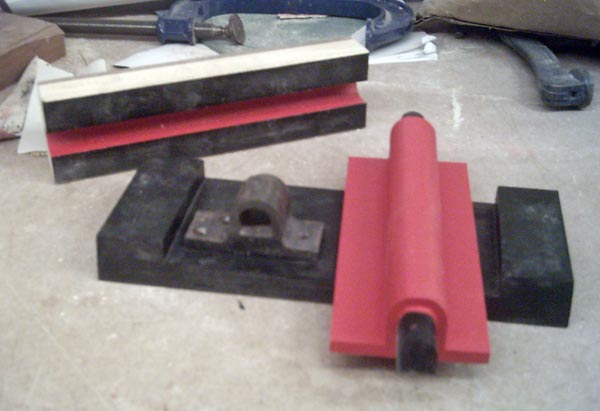
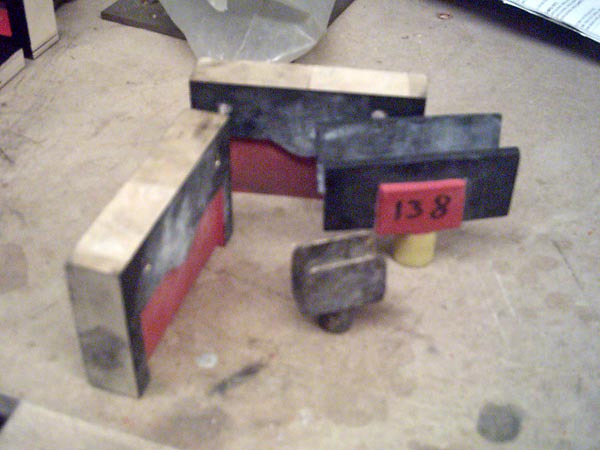
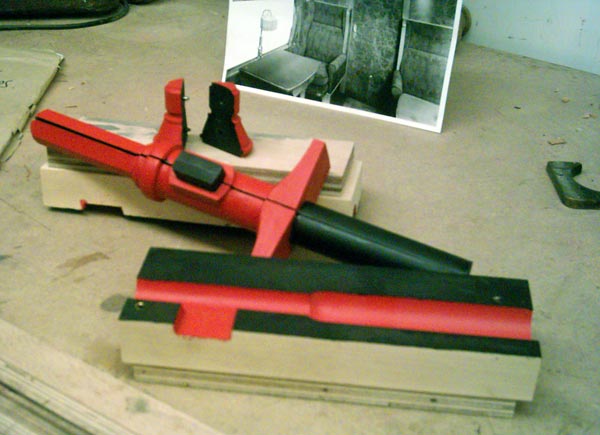
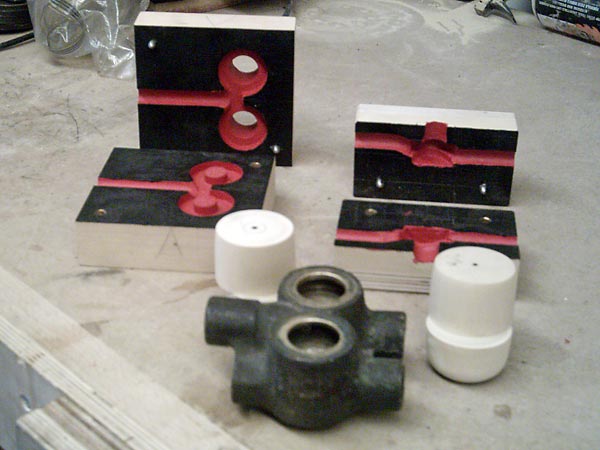
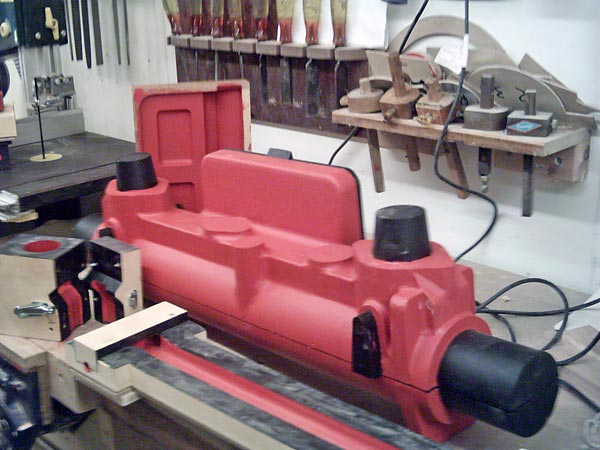
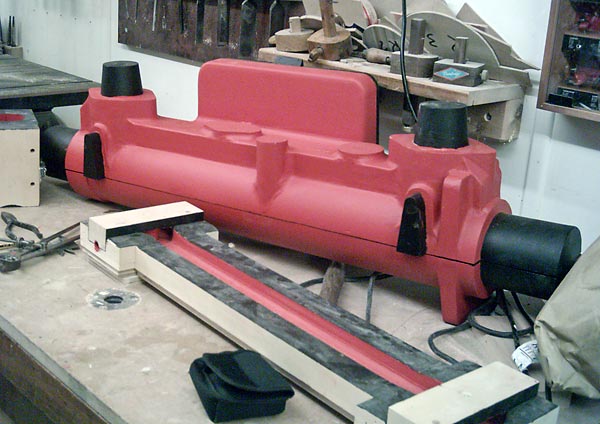
After a small distraction to slightly modify a firebar pattern (made several years back) to remove the need to grind material off the end of casting made from it, I got back to the GW toilet hot & cold water mixer valve body. The picture, right, shows the completed pattern and coreboxes. The corebox to the left of the original main body is to produce the undercut at the outlet end of the valve body - that's the end with three ports. The corebox above, creates the cavity where the valves proper fit. The final corebox, below, will be used twice per casting to make the passageways through the lower part of the body. The model shown below will help clarify this Rubik's Cube of a pattern! The pattern for the main body is top right. Spare a thought for the effort that has gone into these details the next time you wash your hands!! Colin Jenkins came to BN on Sunday to collect this trivial little mixer valve and just so I wouldn't get bored he dropped of a few more door handle and lock bits and pieces to keep me out of mischief. More notes and images to follow as these progress |
The pattern and core boxes for the GW toilet hot & cold water mixer valve body. |
|
This is the pattern, right, for the top portion of the table lamp for LMS RFO 7511 currently making steady progress in the cattle dock at Bridgnorth. Again this a bit like the lubricator union. It is such a small lump it is as easy to machine any cavity from the solid rather that core it out. This will be hollowed out, drilled and tapped to accept the 1/2" x 26TPI thread on a standard Bayonet Connector lampholder. The main column of the table lamp for 7511 is complete after I worked out how the standard bayonet lamp-holder will fit into the upper housing and hold the lampshade. Here is the pattern and corebox for the base portion of the table lamp. The pattern for the top portion is also on top of one part of the corebox. With the photograph I worked from in the background. As you can see although the repro lamps will be pretty close I can't be sure they are identical to the originals, but they will look excellent all the same! Genuine - as close as we can get - replicas! We are considering producing extras for sale to assist with funding the 7511 project. Please contact the webmaster if you would be interested. |
The completed table lamp pattern for LMS FO 7511. |
|
| September 2006 | ||
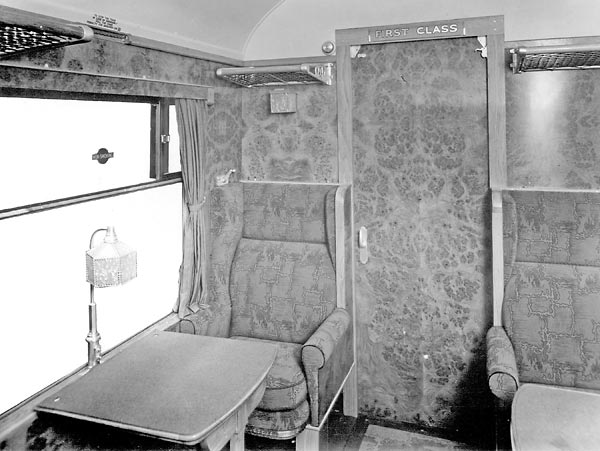
Photo: National Railway Museum |
The next project will be the table lamps for LMS FO 7511. This interior shot is how 7511 will look when the lamps have been made and fitted. Although Hugh has supplied drawing of the lamps they are undimensioned and show a side view only. The photograph tends to suggest the base is oval or elliptical in section but this may be distortion from the camera lens. To guestimate dimensions I'm having to measure the height of the window to gauge the height of the lamp and scale from that. |
|
| August 2006-2 | ||
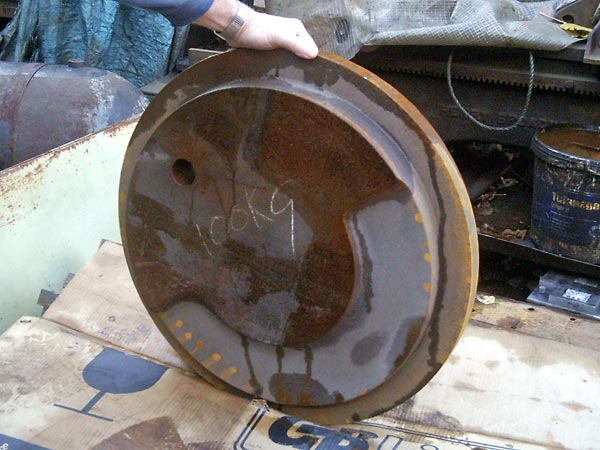
The 24" x 4" Vacuum pump body casting has now been fettled and delivered along with yet another batch of fire-bars and a couple of fire hole protectors. |
|
|
August 2006-1 |
||
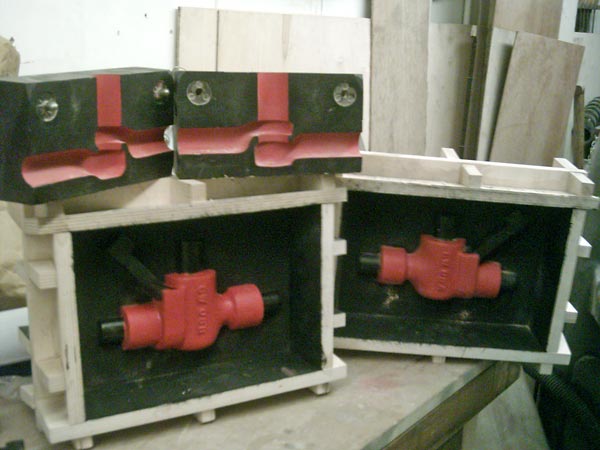
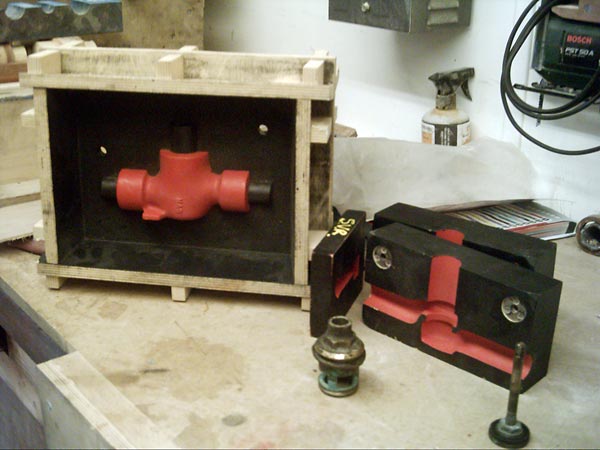
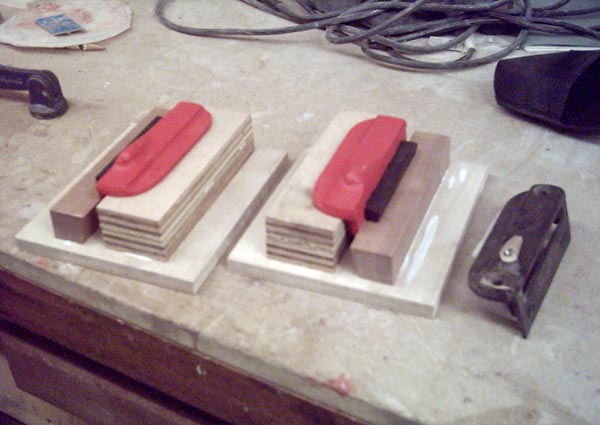
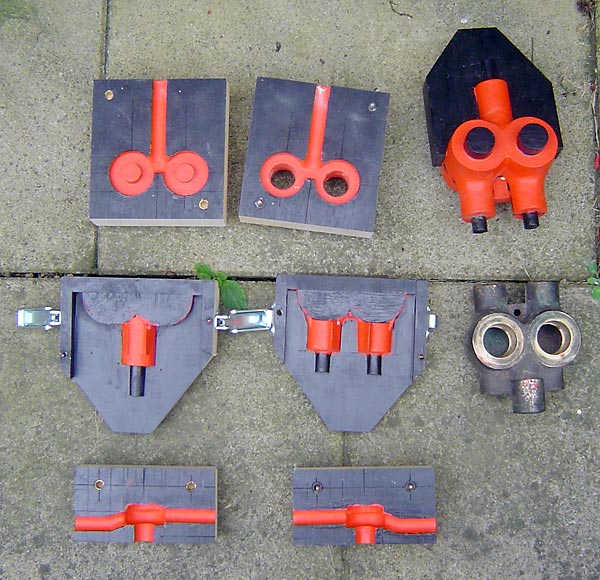
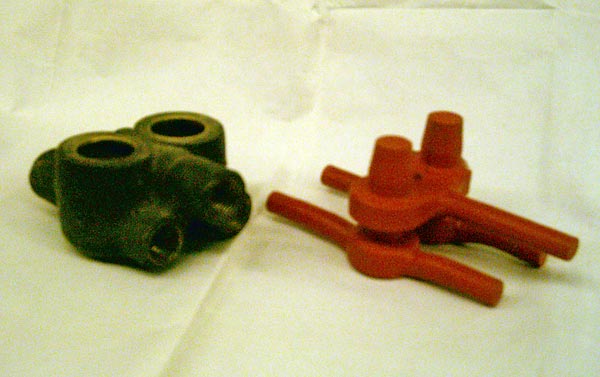
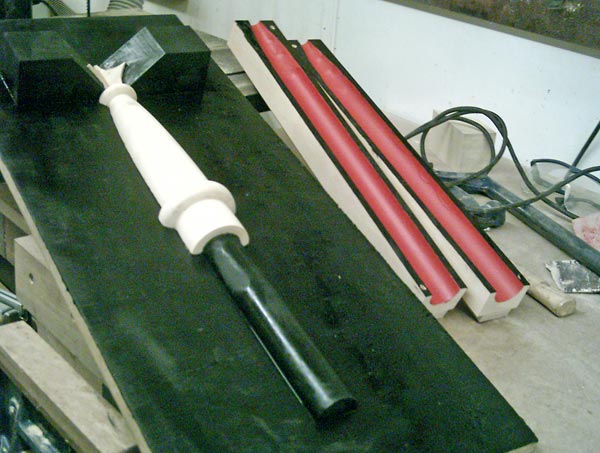
This is the body of the hot/cold mixer valve from the toilets on GW coaches. This innocuous pattern will require no less than 3 cores internally plus a forth to cater for an undercut at the outlet end. Two of the internal cores are identical so only 3 coreboxes will be needed. Two coreboxes are shown completed and a start has been made on the pattern.
This is a model of the cavity within the valve body. This was made to assist in visualising the way the cores would need to interlock.
This is a lubricator union for 7714. This was made as a simple two piece split pattern as it was considered easier to drill the through hole rather than core it out.
The vacuum pump completed in June has now been successfully test cast at Barr and Grosvenor's foundry.
|
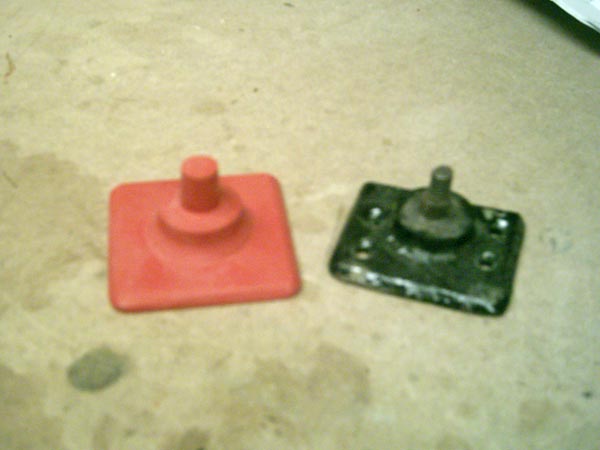
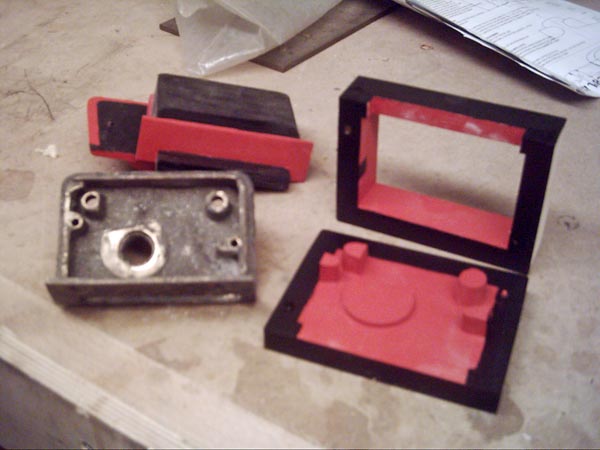
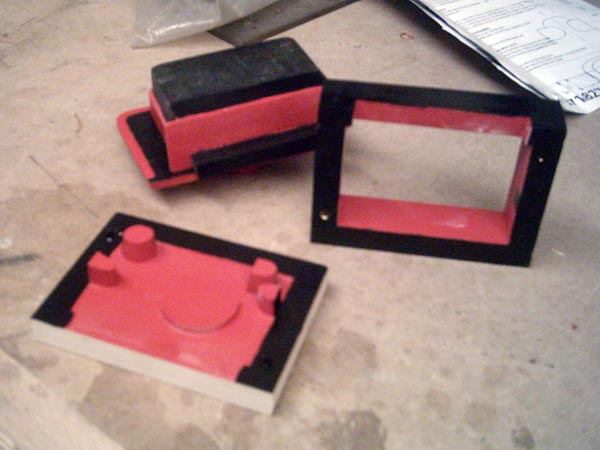
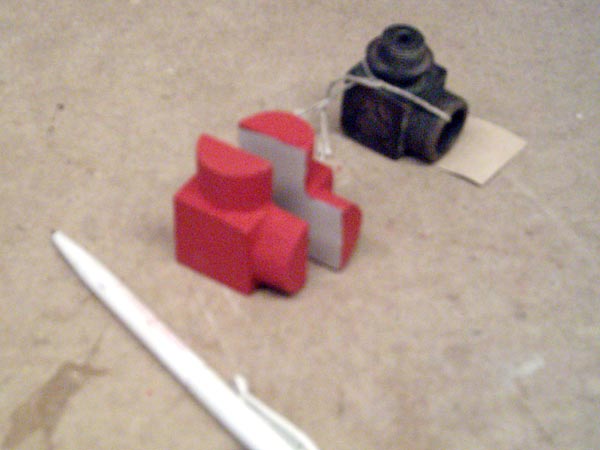
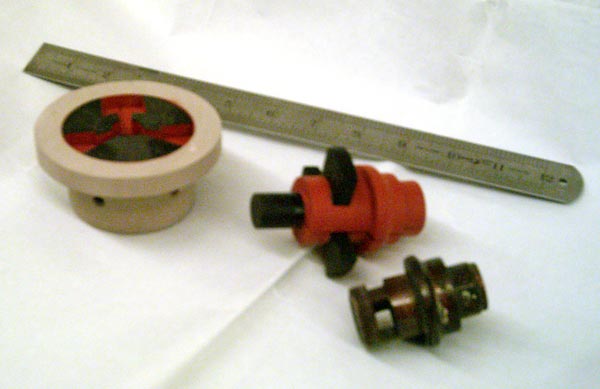
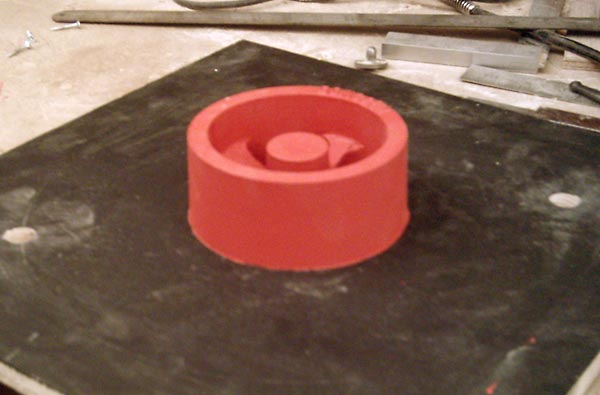
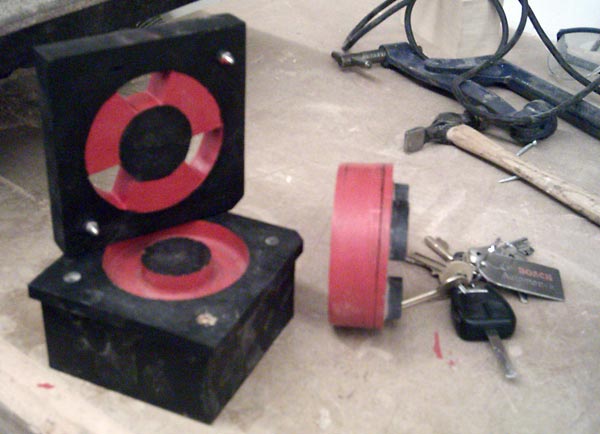
Three photos showing one of the two identical inserts that screw into the valve body shown left. The poppet valve that allows the water to flow fits through this component. To ensure an easy release of the sand core the corebox has been made in 4 pieces.
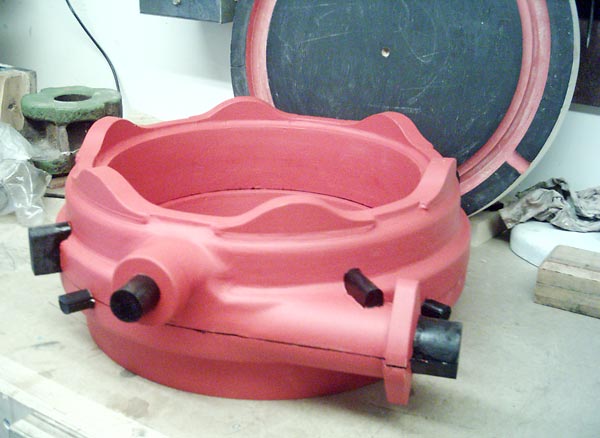
Here is the completed 14" ejector/blower ring for a Manor. A part of one of the coreboxes to create the cavities is propped up in the background. |
|
| July 2006 | ||
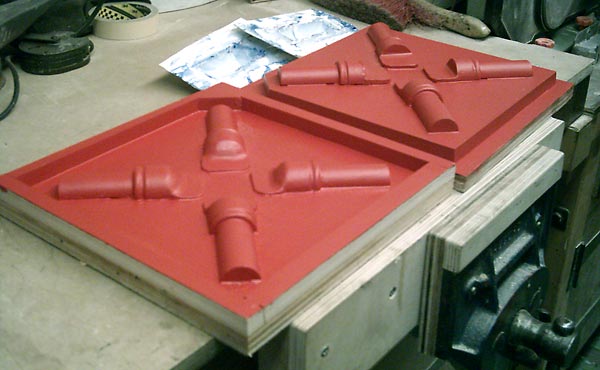
In the pattern shop we have recently completed yet another pattern for our GWR coaching friends. On this occasion it is for a brass fitting that secures the wooden handrail across GW corridor windows. The original pattern was made from wood in the traditional manner. After taking delivery (so the warranty had expired!) I was asked to modify the moulding equipment so that 4 could be cast at once. As it was important that all should be identical I decided to use each original pattern half as a plug to make a GRP (Fibreglass) mould. I then laid up four GRP pattern pairs in the moulds.
The GRP moulds with residue of (blue) Poly Vinyl Alcohol mould release compound. These were made over the original wooden patterns/plugs and then parted from them thus making a negative mould of the final items. Mr Jenkins will be please to note that I have used up some of the remaining white Gel-coat that was originally sourced for the abortive attempt at making carriage warming radiators. Waste not, want not! |
The painted GRP pattern sets board mounted waiting for the moulding box sides to be added.
A pattern for an LMS safety valve adjuster. This is made from some offcuts of the resin used for the final (successful) radiators patterns. |
|
June 2006-2 |
||
The eagle-eyed will have noticed the absence of the finials on the Pagoda recently installed at Northwood. The Friends of Kidderminster had wanted to fit these earlier but other pressures of work and the loss of the original drawing caused a delay. The replacement drawing (with metric dimensions!) arrived through the post very recently so no further excuses could be found. This means the combined ejector blower ring for the Manor drops down the queue a little as does the table lamp for LMS RFO 7511 for Mr McQuade at Bridgnorth. One ray of cheer is the part that was lost from the corebox of the small LMS brake valve proved easier to make than was expected.
One of the BR/LMS superheater element clamps approaching completion. |
The finial (unpainted) for the GW pagoda and the corebox to hollow out the centre.
The Midland brake valve (made several years ago). The piece on top with three holes is the replacement for the part that became lost. |
|
Two photos of the now complete pattern set and some of the coreboxes for the variants of the 24" x 4" vacuum pump.
|
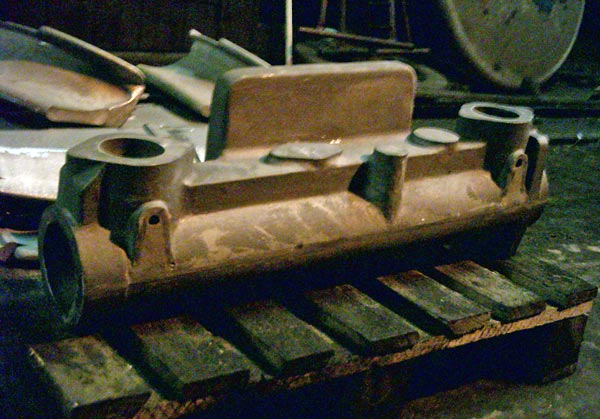
This is the pump body that the pattern set is based upon (thought to be for a 55XX small prairie tank). I.e. only one large bracket to bolt to the loco frames.
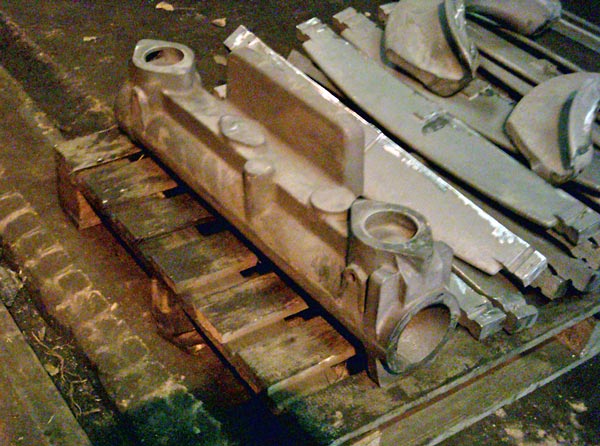
Another variant for a 78XX Manor. The different bracketry can be made out, in that it consists of two areas that bolt to the loco frames. |
|
May 2006 |
||
Having got the carriage warming radiators done and dusted readers might be interested in what the pattern-making team are doing next. Gordon Woodruff (of Dean buffer fame) continues to make cylinder cover, after cylinder cover, after cylinder cover, for GW engines. You can understand the front and rear covers for a 57XX pannier being different since the rear ones must also carry the gland and slide bars but why oh! why couldn't Swindon have designed the left and right the same? (So much for Western standardisation!). One other job that Gordon is looking at is the GW elliptical sand-box lid. This casting looks deceptively simple until you realise the handle and lid is all cast as one. Neill Parker (between JCB turns and mileage grabbing sessions) presently busies himself with a boxed pattern to make 4 x LMS (I think) superheater element clamps at once. (Same idea, for productivity, as the GW door stops). The whole job including cores has to be geared up to be as productive as practicable since so many are needed. As for myself I've also dropped back onto loco work doing a 24" GW vacuum pump. The pattern is a straightforward 2 piece pattern with 5 cores (4 cores boxes since two are identical) The real pain with these pumps is that although they all follow the same basic design there are variations in mounting |
|
bracketry, lubricator and pepper-pot position. I'm planning to minimise future work by making this first one easily alterable. If the need arises for a different one in future I will use this original as a plug to make a GRP mould. From that mould I can then lay-up a GRP replica of the original pattern before I modify it to make a pump body for another class. (Again, so much for 'God's Wonderful' standardisation!). I've also got a cunning (but non-lethal) plan should some blighter ask for a 26" stroke variant next. When that one is out of the way the half completed combined ejector blower ring for a 78XX Manor will find its way back onto the bench. This should be fairly straight forward being a 2 piece pattern with 2 core boxes, We've done a number of these of before but of different choke sizes for other GW classes including Halls (I believe). Another job just appearing on the radar, following what appears to be a success with the 8mm monitor injector body, is the 10mm variant. Tony Massau is arranging supply of drawings via the 82045 group. More next time when this little lot is out of the way.
|


| |
| © 2006 GW(SVR) Association. Page created May 2006, last updated: 6 March, 2007 Webmaster |